基本概念
本教學課程將引導您了解一些基本的 Airflow 概念、物件及其用法,同時撰寫您的第一個 DAG。
範例管線定義
以下是一個基本管線定義的範例。如果看起來很複雜,請別擔心,下面會逐行解釋。
import textwrap
from datetime import datetime, timedelta

# The DAG object; we'll need this to instantiate a DAG
from airflow.models.dag import DAG

# Operators; we need this to operate!
from airflow.operators.bash import BashOperator
with DAG(
"tutorial",
# These args will get passed on to each operator
# You can override them on a per-task basis during operator initialization
default_args={
    "depends_on_past": False,
    "email": ["airflow@example.com"],
    "email_on_failure": False,
    "email_on_retry": False,
    "retries": 1,
    "retry_delay": timedelta(minutes=5),
    # 'queue': 'bash_queue',
    # 'pool': 'backfill',
    # 'priority_weight': 10,
    # 'end_date': datetime(2016, 1, 1),
    # 'wait_for_downstream': False,
    # 'sla': timedelta(hours=2),
    # 'execution_timeout': timedelta(seconds=300),
    # 'on_failure_callback': some_function, # or list of functions
    # 'on_success_callback': some_other_function, # or list of functions
    # 'on_retry_callback': another_function, # or list of functions
    # 'sla_miss_callback': yet_another_function, # or list of functions
    # 'on_skipped_callback': another_function, #or list of functions
    # 'trigger_rule': 'all_success'
},
description="A simple tutorial DAG",
schedule=timedelta(days=1),
start_date=datetime(2021, 1, 1),
catchup=False,
tags=["example"],
) as dag:
# t1, t2 and t3 are examples of tasks created by instantiating operators
t1 = BashOperator(
task_id="print_date",
bash_command="date",
)
t2 = BashOperator(
task_id="sleep",
depends_on_past=False,
bash_command="sleep 5",
retries=3,
)
t1.doc_md = textwrap.dedent(
"""\
#### Task Documentation
You can document your task using the attributes `doc_md` (markdown),
`doc` (plain text), `doc_rst`, `doc_json`, `doc_yaml` which gets
rendered in the UI's Task Instance Details page.

**Image Credit:** Randall Munroe, [XKCD](https://xkcd.com/license.html)
"""
)
dag.doc_md = __doc__ # providing that you have a docstring at the beginning of the DAG; OR
dag.doc_md = """
This is a documentation placed anywhere
""" # otherwise, type it like this
templated_command = textwrap.dedent(
"""
{% for i in range(5) %}
echo "{{ ds }}"
echo "{{ macros.ds_add(ds, 7)}}"
{% endfor %}
"""
)
t3 = BashOperator(
task_id="templated",
depends_on_past=False,
bash_command=templated_command,
)
t1 >> [t2, t3]
這是一個 DAG 定義檔
一件需要理解的事情(一開始可能對大家來說不是那麼直觀)是這個 Airflow Python 腳本實際上只是一個組態檔,以程式碼形式指定 DAG 的結構。這裡定義的實際任務將在與此腳本上下文不同的上下文中執行。不同的任務在不同的時間點在不同的 worker 上執行,這表示此腳本不能用於任務之間的跨通訊。請注意,為了這個目的,我們有一個更進階的功能叫做 XComs。
人們有時會將 DAG 定義檔視為他們可以進行實際資料處理的地方 - 事實並非如此!腳本的目的是定義一個 DAG 物件。它需要快速評估(秒,而不是分鐘),因為排程器會定期執行它以反映任何變更。
導入模組
Airflow 管線只是一個 Python 腳本,恰好定義了一個 Airflow DAG 物件。讓我們先導入我們需要的函式庫。
import textwrap
from datetime import datetime, timedelta
# The DAG object; we'll need this to instantiate a DAG
from airflow.models.dag import DAG
# Operators; we need this to operate!
from airflow.operators.bash import BashOperator
請參閱 模組管理 以了解有關 Python 和 Airflow 如何管理模組的詳細資訊。
預設參數
我們即將建立一個 DAG 和一些任務,我們可以選擇顯式地將一組參數傳遞給每個任務的建構函式(這將變得冗餘),或者(更好!)我們可以定義一個預設參數字典,我們可以在建立任務時使用。
# These args will get passed on to each operator
# You can override them on a per-task basis during operator initialization
default_args={
"depends_on_past": False,
"email": ["airflow@example.com"],
"email_on_failure": False,
"email_on_retry": False,
"retries": 1,
"retry_delay": timedelta(minutes=5),
# 'queue': 'bash_queue',
# 'pool': 'backfill',
# 'priority_weight': 10,
# 'end_date': datetime(2016, 1, 1),
# 'wait_for_downstream': False,
# 'sla': timedelta(hours=2),
# 'execution_timeout': timedelta(seconds=300),
# 'on_failure_callback': some_function, # or list of functions
# 'on_success_callback': some_other_function, # or list of functions
# 'on_retry_callback': another_function, # or list of functions
# 'sla_miss_callback': yet_another_function, # or list of functions
# 'on_skipped_callback': another_function, #or list of functions
# 'trigger_rule': 'all_success'
},
有關 BaseOperator 的參數及其作用的更多資訊,請參閱 airflow.models.baseoperator.BaseOperator 文件。
另請注意,您可以輕鬆定義不同的參數集,以服務不同的目的。一個例子是在生產和開發環境之間使用不同的設定。
實例化 DAG
我們需要一個 DAG 物件來將我們的任務巢狀放入其中。在這裡,我們傳遞一個字串,定義 dag_id,它作為您的 DAG 的唯一識別符。我們也傳遞了我們剛剛定義的預設參數字典,並為 DAG 定義了 1 天的 schedule。
with DAG(
    "tutorial",
    # These args will get passed on to each operator
    # You can override them on a per-task basis during operator initialization
    default_args={
        "depends_on_past": False,
        "email": ["airflow@example.com"],
        "email_on_failure": False,
        "email_on_retry": False,
        "retries": 1,
        "retry_delay": timedelta(minutes=5),
        # 'queue': 'bash_queue',
        # 'pool': 'backfill',
        # 'priority_weight': 10,
        # 'end_date': datetime(2016, 1, 1),
        # 'wait_for_downstream': False,
        # 'sla': timedelta(hours=2),
        # 'execution_timeout': timedelta(seconds=300),
        # 'on_failure_callback': some_function, # or list of functions
        # 'on_success_callback': some_other_function, # or list of functions
        # 'on_retry_callback': another_function, # or list of functions
        # 'sla_miss_callback': yet_another_function, # or list of functions
        # 'on_skipped_callback': another_function, #or list of functions
        # 'trigger_rule': 'all_success'
    },
    description="A simple tutorial DAG",
    schedule=timedelta(days=1),
    start_date=datetime(2021, 1, 1),
    catchup=False,
    tags=["example"],
) as dag:
運算子
運算子定義了 Airflow 要完成的工作單元。使用運算子是在 Airflow 中定義工作的經典方法。對於某些使用案例,最好使用 TaskFlow API 在 Pythonic 上下文中定義工作,如 使用 TaskFlow 中所述。目前,使用運算子有助於在我們的 DAG 程式碼中視覺化任務相依性。
所有運算子都繼承自 BaseOperator,其中包含在 Airflow 中執行工作所需的所有參數。從這裡開始,每個運算子都包含其完成的工作類型獨有的參數。一些最受歡迎的運算子是 PythonOperator、BashOperator 和 KubernetesPodOperator。
Airflow 根據您傳遞給運算子的參數完成工作。在本教學課程中,我們使用 BashOperator 執行一些 bash 腳本。
任務
若要在 DAG 中使用運算子,您必須將其例項化為任務。任務決定如何在 DAG 的上下文中執行運算子的工作。
在以下範例中,我們將 BashOperator 例項化為兩個不同的任務,以便執行兩個不同的 bash 腳本。每個例項化的第一個參數 task_id 作為任務的唯一識別符。
t1 = BashOperator(
    task_id="print_date",
    bash_command="date",
)

t2 = BashOperator(
    task_id="sleep",
    depends_on_past=False,
    bash_command="sleep 5",
    retries=3,
)
請注意,我們如何將運算子特定參數(bash_command)和所有運算子通用的參數(retries),從 BaseOperator 繼承而來,混合傳遞給運算子的建構函式。這比為每個建構函式呼叫傳遞每個參數更簡單。此外,請注意,在第二個任務中,我們使用 3 覆寫了 retries 參數。
任務的優先順序規則如下
顯式傳遞的參數
存在於
default_args字典中的值運算子的預設值(如果存在)
注意
任務必須包含或繼承參數 task_id 和 owner,否則 Airflow 將引發例外。全新安裝的 Airflow 將為 owner 設定預設值 ‘airflow’,因此您真正需要擔心的只是確保 task_id 有值。
使用 Jinja 模板
Airflow 利用 Jinja 模板 的強大功能,並為管線作者提供一組內建參數和巨集。Airflow 也為管線作者提供鉤子,以定義他們自己的參數、巨集和模板。
本教學課程僅略微觸及您可以在 Airflow 中使用模板執行的操作,但本節的目標是讓您了解此功能的存在,讓您熟悉雙大括號,並指向最常見的模板變數:{{ ds }}(今天的「日期戳記」)。
templated_command = textwrap.dedent(
    """
{% for i in range(5) %}
    echo "{{ ds }}"
    echo "{{ macros.ds_add(ds, 7)}}"
{% endfor %}
"""
)

t3 = BashOperator(
    task_id="templated",
    depends_on_past=False,
    bash_command=templated_command,
)
請注意,templated_command 在 {% %} 區塊中包含程式碼邏輯,參考參數,例如 {{ ds }},並呼叫一個函式,如 {{ macros.ds_add(ds, 7)}}。
檔案也可以傳遞給 bash_command 參數,例如 bash_command='templated_command.sh',其中檔案位置相對於包含管線檔案的目錄(在本例中為 tutorial.py)。這可能因許多原因而令人嚮往,例如分離您的腳本邏輯和管線程式碼、允許在以不同語言組成的檔案中進行適當的程式碼醒目提示,以及管線結構中的一般靈活性。也可以將您的 template_searchpath 定義為指向 DAG 建構函式呼叫中的任何資料夾位置。
使用相同的 DAG 建構函式呼叫,可以定義 user_defined_macros,讓您可以指定自己的變數。例如,將 dict(foo='bar') 傳遞給此參數可讓您在模板中使用 {{ foo }}。此外,指定 user_defined_filters 可讓您註冊自己的篩選器。例如,將 dict(hello=lambda name: 'Hello %s' % name) 傳遞給此參數可讓您在模板中使用 {{ 'world' | hello }}。有關自訂篩選器的更多資訊,請查看 Jinja 文件。
有關可以在模板中參考的變數和巨集的更多資訊,請務必閱讀 模板參考。
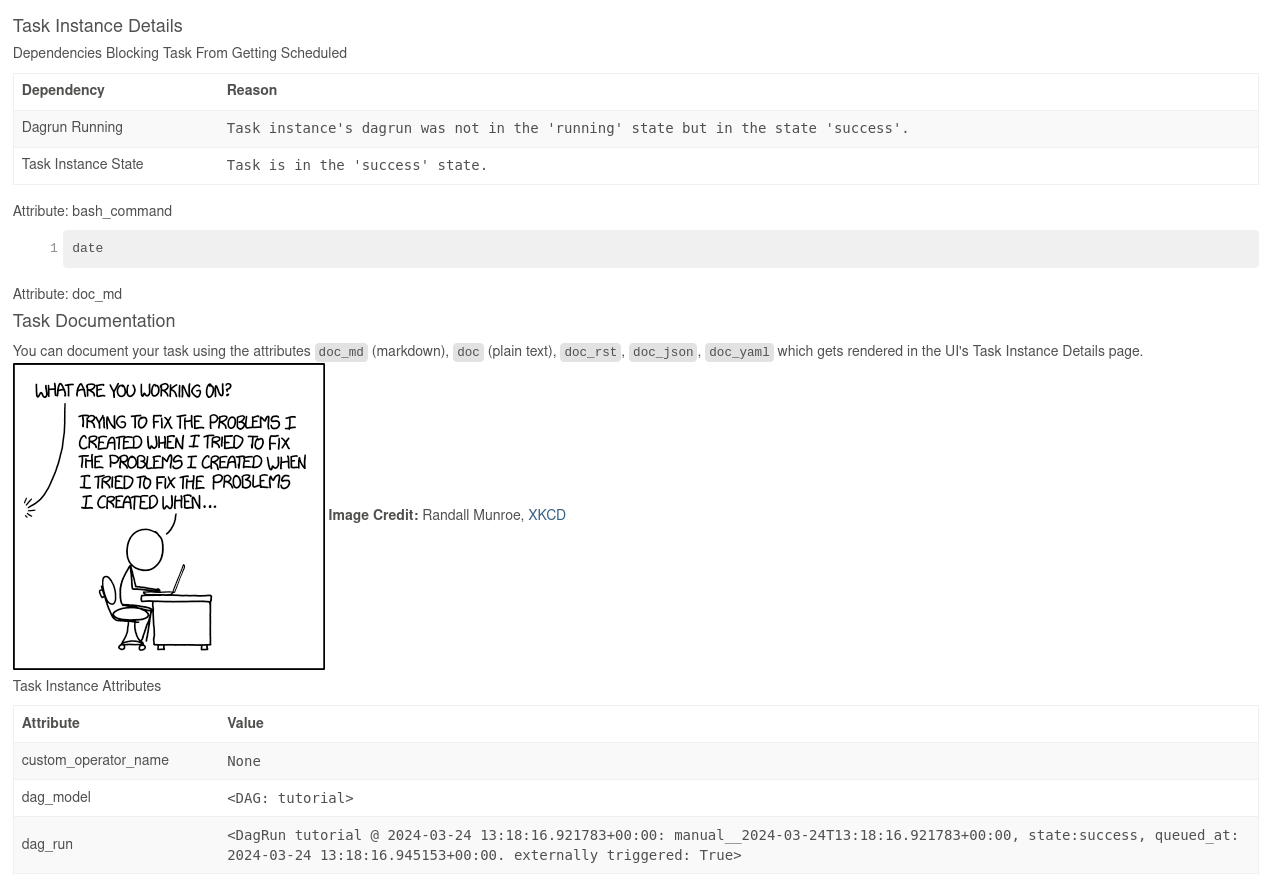
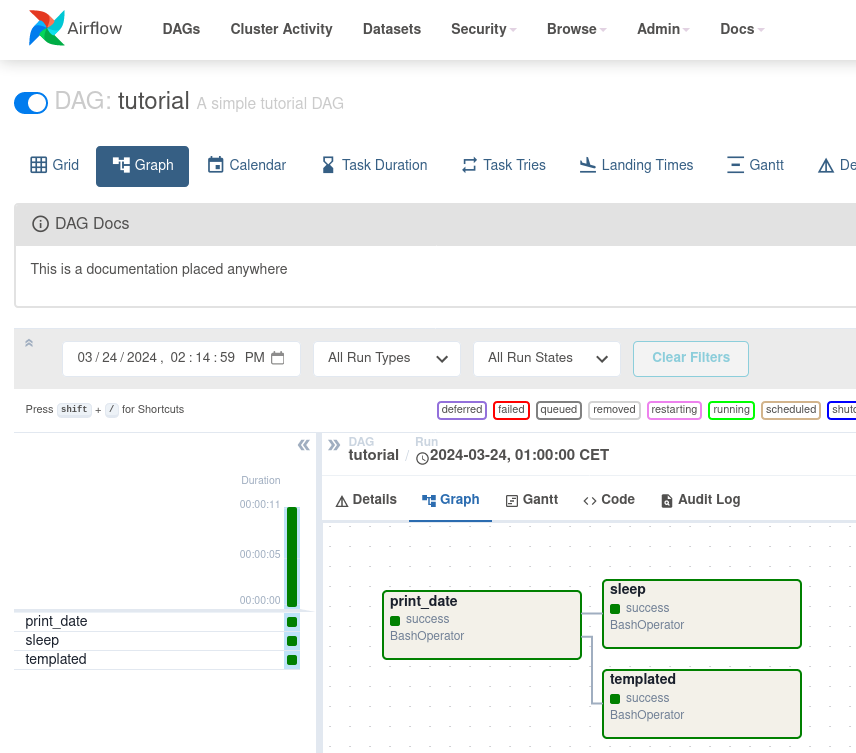
新增 DAG 和任務文件
我們可以為 DAG 或每個單一任務新增文件。DAG 文件目前僅支援 markdown,而任務文件支援純文字、markdown、reStructuredText、json 和 yaml。DAG 文件可以寫成 DAG 檔案開頭的文件字串(推薦),或檔案中的任何其他位置。您可以在下面找到一些關於如何實作任務和 DAG 文件以及螢幕截圖的範例
t1.doc_md = textwrap.dedent(
"""\
#### Task Documentation
You can document your task using the attributes `doc_md` (markdown),
`doc` (plain text), `doc_rst`, `doc_json`, `doc_yaml` which gets
rendered in the UI's Task Instance Details page.

**Image Credit:** Randall Munroe, [XKCD](https://xkcd.com/license.html)
"""
)
dag.doc_md = __doc__ # providing that you have a docstring at the beginning of the DAG; OR
dag.doc_md = """
This is a documentation placed anywhere
""" # otherwise, type it like this
設定相依性
我們有任務 t1、t2 和 t3 彼此相依。以下是一些您可以定義它們之間相依性的方法
t1.set_downstream(t2)

# This means that t2 will depend on t1
# running successfully to run.
# It is equivalent to:
t2.set_upstream(t1)

# The bit shift operator can also be
# used to chain operations:
t1 >> t2

# And the upstream dependency with the
# bit shift operator:
t2 << t1

# Chaining multiple dependencies becomes
# concise with the bit shift operator:
t1 >> t2 >> t3

# A list of tasks can also be set as
# dependencies. These operations
# all have the same effect:
t1.set_downstream([t2, t3])
t1 >> [t2, t3]
[t2, t3] << t1
請注意,當執行您的腳本時,Airflow 會在 DAG 中發現循環或相依性被參考多次時引發例外。
回顧
好的,所以我們有一個非常基本的 DAG。此時,您的程式碼應如下所示
import textwrap
from datetime import datetime, timedelta
# The DAG object; we'll need this to instantiate a DAG
from airflow.models.dag import DAG
# Operators; we need this to operate!
from airflow.operators.bash import BashOperator
with DAG(
"tutorial",
# These args will get passed on to each operator
# You can override them on a per-task basis during operator initialization
default_args={
"depends_on_past": False,
"email": ["airflow@example.com"],
"email_on_failure": False,
"email_on_retry": False,
"retries": 1,
"retry_delay": timedelta(minutes=5),
# 'queue': 'bash_queue',
# 'pool': 'backfill',
# 'priority_weight': 10,
# 'end_date': datetime(2016, 1, 1),
# 'wait_for_downstream': False,
# 'sla': timedelta(hours=2),
# 'execution_timeout': timedelta(seconds=300),
# 'on_failure_callback': some_function, # or list of functions
# 'on_success_callback': some_other_function, # or list of functions
# 'on_retry_callback': another_function, # or list of functions
# 'sla_miss_callback': yet_another_function, # or list of functions
# 'on_skipped_callback': another_function, #or list of functions
# 'trigger_rule': 'all_success'
},
description="A simple tutorial DAG",
schedule=timedelta(days=1),
start_date=datetime(2021, 1, 1),
catchup=False,
tags=["example"],
) as dag:
# t1, t2 and t3 are examples of tasks created by instantiating operators
t1 = BashOperator(
task_id="print_date",
bash_command="date",
)
t2 = BashOperator(
task_id="sleep",
depends_on_past=False,
bash_command="sleep 5",
retries=3,
)
t1.doc_md = textwrap.dedent(
"""\
#### Task Documentation
You can document your task using the attributes `doc_md` (markdown),
`doc` (plain text), `doc_rst`, `doc_json`, `doc_yaml` which gets
rendered in the UI's Task Instance Details page.

**Image Credit:** Randall Munroe, [XKCD](https://xkcd.com/license.html)
"""
)
dag.doc_md = __doc__ # providing that you have a docstring at the beginning of the DAG; OR
dag.doc_md = """
This is a documentation placed anywhere
""" # otherwise, type it like this
templated_command = textwrap.dedent(
"""
{% for i in range(5) %}
echo "{{ ds }}"
echo "{{ macros.ds_add(ds, 7)}}"
{% endfor %}
"""
)
t3 = BashOperator(
task_id="templated",
depends_on_past=False,
bash_command=templated_command,
)
t1 >> [t2, t3]
測試
執行腳本
是時候執行一些測試了。首先,讓我們確保管線已成功解析。
假設我們將上一步的程式碼儲存在 airflow.cfg 中引用的 DAG 資料夾中的 tutorial.py 中。DAG 的預設位置是 ~/airflow/dags。
python ~/airflow/dags/tutorial.py
如果腳本沒有引發例外,則表示您沒有犯下任何可怕的錯誤,並且您的 Airflow 環境在某種程度上是健全的。
命令列元數據驗證
讓我們執行一些命令來進一步驗證此腳本。
# initialize the database tables
airflow db migrate

# print the list of active DAGs
airflow dags list

# prints the list of tasks in the "tutorial" DAG
airflow tasks list tutorial

# prints the hierarchy of tasks in the "tutorial" DAG
airflow tasks list tutorial --tree
測試
讓我們透過針對特定日期執行實際的任務實例進行測試。在此上下文中指定的日期稱為邏輯日期(基於歷史原因也稱為執行日期),它模擬排程器針對特定日期和時間執行您的任務或 DAG,即使它實際上現在(或在其相依性滿足後立即)執行。
我們說排程器針對特定日期和時間(而不是在)執行您的任務。這是因為 DAG 的每次執行在概念上代表的不是特定日期和時間,而是兩個時間之間的間隔,稱為 資料間隔。DAG 執行的邏輯日期是其資料間隔的開始。
# command layout: command subcommand [dag_id] [task_id] [(optional) date]

# testing print_date
airflow tasks test tutorial print_date 2015-06-01

# testing sleep
airflow tasks test tutorial sleep 2015-06-01
現在回想一下我們之前對模板做了什麼?看看這個模板是如何透過執行此命令來呈現和執行的
# testing templated
airflow tasks test tutorial templated 2015-06-01
這應該會導致顯示事件的詳細日誌,並最終執行您的 bash 命令並印出結果。
請注意,airflow tasks test 命令在本地執行任務實例,將其日誌輸出到 stdout(螢幕上),不理會相依性,並且不與資料庫通訊狀態(執行中、成功、失敗、…)。它僅允許測試單個任務實例。
同樣適用於 airflow dags test,但在 DAG 層級。它執行給定 DAG ID 的單個 DAG 執行。雖然它確實考慮了任務相依性,但沒有狀態註冊在資料庫中。如果您的一個任務期望在某個位置有資料,並且該資料可用,則它對於在本地測試 DAG 的完整執行非常方便。
回填
一切看起來都運作良好,所以讓我們執行回填。backfill 將尊重您的相依性,將日誌發送到檔案並與資料庫通訊以記錄狀態。如果您啟用了 webserver,您將能夠追蹤進度。airflow webserver 將啟動一個 web 伺服器,如果您有興趣以視覺方式追蹤回填進度。
請注意,如果您使用 depends_on_past=True,則個別任務實例將相依於其先前的任務實例的成功(也就是說,根據邏輯日期)。邏輯日期等於 start_date 的任務實例將忽略此相依性,因為不會為它們建立先前的任務實例。
當使用 depends_on_past=True 時,您可能還想考慮 wait_for_downstream=True。雖然 depends_on_past=True 會導致任務實例相依於其先前 task_instance 的成功,但 wait_for_downstream=True 也會導致任務實例等待先前任務實例的所有直接下游任務實例成功。
此上下文中的日期範圍是 start_date 和可選的 end_date,用於使用來自此 DAG 的任務實例填充執行排程。
# optional, start a web server in debug mode in the background
# airflow webserver --debug &

# start your backfill on a date range
airflow dags backfill tutorial \
    --start-date 2015-06-01 \
    --end-date 2015-06-07
下一步?
就這樣!您已經撰寫、測試和回填了您的第一個 Airflow 管線。將您的程式碼合併到針對它運行排程器的儲存庫中,應該會導致每天觸發和運行。
以下是您接下來可能想做的一些事情
另請參閱
繼續進行本教學課程的下一步:使用 TaskFlow
跳到 核心概念 章節,以詳細說明 Airflow 概念,例如 DAG、任務、運算子等等