Kubernetes 執行器
注意
從 Airflow 2.7.0 開始,您需要安裝 cncf.kubernetes provider 套件才能使用此執行器。這可以透過安裝 apache-airflow-providers-cncf-kubernetes>=7.4.0 或使用 cncf.kubernetes extras 安裝 Airflow 來完成:pip install 'apache-airflow[cncf.kubernetes]'。
Kubernetes 執行器會在 Kubernetes 叢集上以自己的 Pod 執行每個任務實例。
KubernetesExecutor 作為 Airflow 排程器中的一個進程執行。排程器本身不一定需要在 Kubernetes 上執行,但需要存取 Kubernetes 叢集。
KubernetesExecutor 需要後端使用非 sqlite 資料庫。
當 DAG 提交任務時,KubernetesExecutor 會向 Kubernetes API 請求 worker Pod。然後,worker Pod 會執行任務、回報結果並終止。
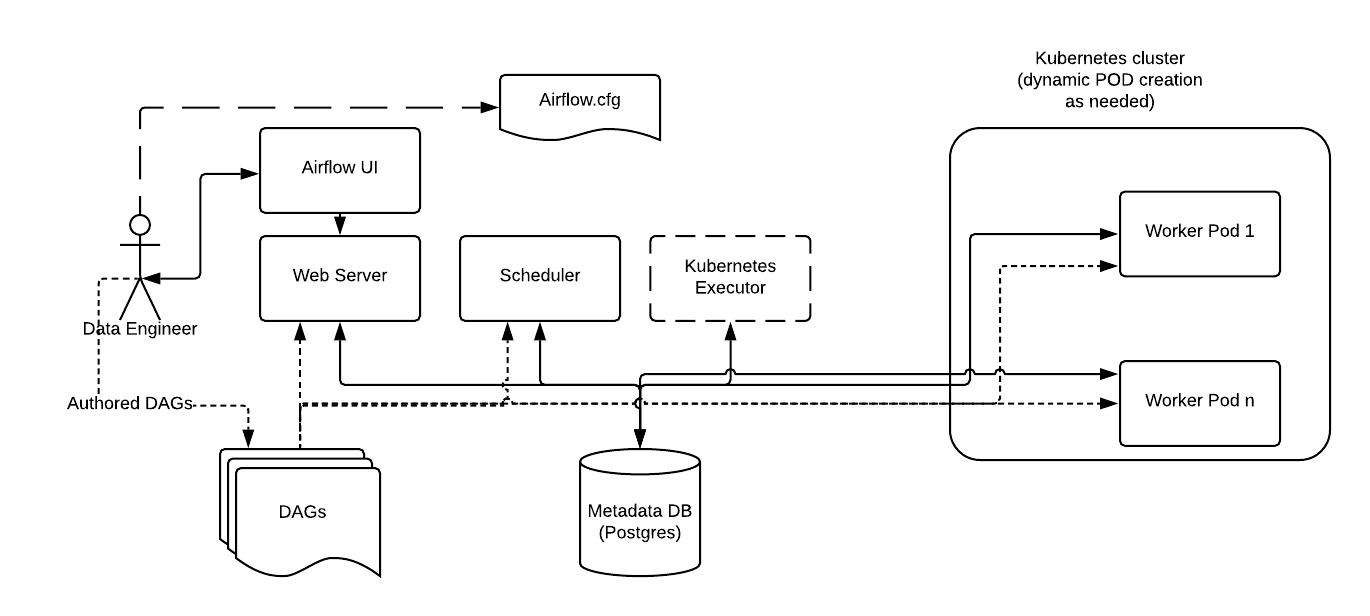
下面顯示一個在 Kubernetes 叢集中分散式五個節點上執行的 Airflow 部署範例。
與常規 Airflow 架構一致,Workers 需要存取 DAG 檔案,才能執行這些 DAG 中的任務並與 Metadata 倉庫互動。此外,Kubernetes Executor 特有的組態資訊(例如 worker 命名空間和映像檔資訊)需要在 Airflow 組態檔中指定。
此外,Kubernetes Executor 允許使用 Executor 組態在每個任務的基礎上指定其他功能。

組態設定
pod_template_file
若要自訂用於 k8s executor worker 進程的 Pod,您可以建立 Pod 範本檔案。您必須在 airflow.cfg 的 kubernetes_executor 區段中的 pod_template_file 選項中提供範本檔案的路徑。
Airflow 對於 Pod 範本檔案有兩個嚴格的要求:基礎映像檔和 Pod 名稱。
基礎映像檔
pod_template_file 必須在 spec.containers[0] 位置有一個名為 base 的容器,並且必須指定其 image。
您可以自由地在此必要容器之後建立 sidecar 容器,但 Airflow 假設 airflow worker 容器存在於容器陣列的開頭,並假設該容器名為 base。
注意
Airflow 可能會覆寫基礎容器 image,例如透過 pod_override 組態;但它必須存在於範本檔案中,且不得為空白。
Pod 名稱
Pod 的 metadata.name 必須在範本檔案中設定。此欄位將始終在 Pod 啟動時動態設定,以保證所有 Pod 的唯一性。但同樣地,它必須包含在範本中,且不能留空。
Pod 範例範本
考慮到這些要求,以下是一些基本 pod_template_file YAML 檔案的範例。
注意
當使用預設 Airflow 組態值時,以下範例應該可以運作。但是,許多自訂組態值也需要透過此範本明確傳遞到 Pod。這包括但不限於 SQL 組態、必要的 Airflow 連線、DAGs 資料夾路徑和記錄設定。請參閱 組態參考 以取得詳細資訊。
將 DAG 儲存在映像檔中
---
apiVersion: v1
kind: Pod
metadata:
  name: placeholder-name
spec:
  containers:
    - env:
        - name: AIRFLOW__CORE__EXECUTOR
          value: LocalExecutor
        # Hard Coded Airflow Envs
        - name: AIRFLOW__CORE__FERNET_KEY
          valueFrom:
            secretKeyRef:
              name: RELEASE-NAME-fernet-key
              key: fernet-key
        - name: AIRFLOW__DATABASE__SQL_ALCHEMY_CONN
          valueFrom:
            secretKeyRef:
              name: RELEASE-NAME-airflow-metadata
              key: connection
        - name: AIRFLOW_CONN_AIRFLOW_DB
          valueFrom:
            secretKeyRef:
              name: RELEASE-NAME-airflow-metadata
              key: connection
      image: dummy_image
      imagePullPolicy: IfNotPresent
      name: base
      volumeMounts:
        - mountPath: "/opt/airflow/logs"
          name: airflow-logs
        - mountPath: /opt/airflow/airflow.cfg
          name: airflow-config
          readOnly: true
          subPath: airflow.cfg
  restartPolicy: Never
  securityContext:
    runAsUser: 50000
    fsGroup: 50000
  serviceAccountName: "RELEASE-NAME-worker-serviceaccount"
  volumes:
    - emptyDir: {}
      name: airflow-logs
    - configMap:
        name: RELEASE-NAME-airflow-config
      name: airflow-config
將 DAG 儲存在 persistentVolume 中
---
apiVersion: v1
kind: Pod
metadata:
  name: placeholder-name
spec:
  containers:
    - env:
        - name: AIRFLOW__CORE__EXECUTOR
          value: LocalExecutor
        # Hard Coded Airflow Envs
        - name: AIRFLOW__CORE__FERNET_KEY
          valueFrom:
            secretKeyRef:
              name: RELEASE-NAME-fernet-key
              key: fernet-key
        - name: AIRFLOW__DATABASE__SQL_ALCHEMY_CONN
          valueFrom:
            secretKeyRef:
              name: RELEASE-NAME-airflow-metadata
              key: connection
        - name: AIRFLOW_CONN_AIRFLOW_DB
          valueFrom:
            secretKeyRef:
              name: RELEASE-NAME-airflow-metadata
              key: connection
      image: dummy_image
      imagePullPolicy: IfNotPresent
      name: base
      volumeMounts:
        - mountPath: "/opt/airflow/logs"
          name: airflow-logs
        - mountPath: /opt/airflow/dags
          name: airflow-dags
          readOnly: true
        - mountPath: /opt/airflow/airflow.cfg
          name: airflow-config
          readOnly: true
          subPath: airflow.cfg
  restartPolicy: Never
  securityContext:
    runAsUser: 50000
    fsGroup: 50000
  serviceAccountName: "RELEASE-NAME-worker-serviceaccount"
  volumes:
    - name: airflow-dags
      persistentVolumeClaim:
        claimName: RELEASE-NAME-dags
    - emptyDir: {}
      name: airflow-logs
    - configMap:
        name: RELEASE-NAME-airflow-config
      name: airflow-config
從 git 中提取 DAG
---
apiVersion: v1
kind: Pod
metadata:
  name: dummy-name
spec:
  initContainers:
    - name: git-sync
      image: "registry.k8s.io/git-sync/git-sync:v3.6.3"
      env:
        - name: GIT_SYNC_BRANCH
          value: "v2-2-stable"
        - name: GIT_SYNC_REPO
          value: "https://github.com/apache/airflow.git"
        - name: GIT_SYNC_DEPTH
          value: "1"
        - name: GIT_SYNC_ROOT
          value: "/git"
        - name: GIT_SYNC_DEST
          value: "repo"
        - name: GIT_SYNC_ADD_USER
          value: "true"
        - name: GIT_SYNC_ONE_TIME
          value: "true"
      volumeMounts:
        - name: airflow-dags
          mountPath: /git
  containers:
    - env:
        - name: AIRFLOW__CORE__EXECUTOR
          value: LocalExecutor
        # Hard Coded Airflow Envs
        - name: AIRFLOW__CORE__FERNET_KEY
          valueFrom:
            secretKeyRef:
              name: RELEASE-NAME-fernet-key
              key: fernet-key
        - name: AIRFLOW__DATABASE__SQL_ALCHEMY_CONN
          valueFrom:
            secretKeyRef:
              name: RELEASE-NAME-airflow-metadata
              key: connection
        - name: AIRFLOW_CONN_AIRFLOW_DB
          valueFrom:
            secretKeyRef:
              name: RELEASE-NAME-airflow-metadata
              key: connection
      image: dummy_image
      imagePullPolicy: IfNotPresent
      name: base
      volumeMounts:
        - mountPath: "/opt/airflow/logs"
          name: airflow-logs
        - mountPath: /opt/airflow/dags
          name: airflow-dags
          subPath: repo/airflow/example_dags
          readOnly: false
        - mountPath: /opt/airflow/airflow.cfg
          name: airflow-config
          readOnly: true
          subPath: airflow.cfg
  restartPolicy: Never
  securityContext:
    runAsUser: 50000
    fsGroup: 50000
  serviceAccountName: "RELEASE-NAME-worker-serviceaccount"
  volumes:
    - name: airflow-dags
      emptyDir: {}
    - name: airflow-logs
      emptyDir: {}
    - configMap:
        name: RELEASE-NAME-airflow-config
      name: airflow-config
pod_override
當使用 KubernetesExecutor 時,Airflow 提供了在每個任務的基礎上覆寫系統預設值的功能。若要使用此功能,請建立 Kubernetes V1pod 物件並填寫您想要的覆寫。
若要覆寫 KubernetesExecutor 啟動的 Pod 的基礎容器,請建立一個具有單一容器的 V1pod,並按如下方式覆寫欄位
        executor_config_volume_mount = {
            "pod_override": k8s.V1Pod(
                spec=k8s.V1PodSpec(
                    containers=[
                        k8s.V1Container(
                            name="base",
                            volume_mounts=[
                                k8s.V1VolumeMount(mount_path="/foo/", name="example-kubernetes-test-volume")
                            ],
                        )
                    ],
                    volumes=[
                        k8s.V1Volume(
                            name="example-kubernetes-test-volume",
                            host_path=k8s.V1HostPathVolumeSource(path="/tmp/"),
                        )
                    ],
                )
            ),
        }

        @task(executor_config=executor_config_volume_mount)
        def test_volume_mount():
            """
            Tests whether the volume has been mounted.
            """

            with open("/foo/volume_mount_test.txt", "w") as foo:
                foo.write("Hello")

            return_code = os.system("cat /foo/volume_mount_test.txt")
            if return_code != 0:
                raise ValueError(f"Error when checking volume mount. Return code {return_code}")

        volume_task = test_volume_mount()
請注意,以下欄位將全部被擴展而不是覆寫。來自spec:volumes 和 init_containers。來自container:volume mounts、環境變數、ports 和 devices。
若要將 sidecar 容器新增至啟動的 Pod,請建立一個 V1pod,其中第一個容器為空,名稱為 base,第二個容器包含您想要的 sidecar。
        executor_config_sidecar = {
            "pod_override": k8s.V1Pod(
                spec=k8s.V1PodSpec(
                    containers=[
                        k8s.V1Container(
                            name="base",
                            volume_mounts=[k8s.V1VolumeMount(mount_path="/shared/", name="shared-empty-dir")],
                        ),
                        k8s.V1Container(
                            name="sidecar",
                            image="ubuntu",
                            args=['echo "retrieved from mount" > /shared/test.txt'],
                            command=["bash", "-cx"],
                            volume_mounts=[k8s.V1VolumeMount(mount_path="/shared/", name="shared-empty-dir")],
                        ),
                    ],
                    volumes=[
                        k8s.V1Volume(name="shared-empty-dir", empty_dir=k8s.V1EmptyDirVolumeSource()),
                    ],
                )
            ),
        }

        @task(executor_config=executor_config_sidecar)
        def test_sharedvolume_mount():
            """
            Tests whether the volume has been mounted.
            """
            for i in range(5):
                try:
                    return_code = os.system("cat /shared/test.txt")
                    if return_code != 0:
                        raise ValueError(f"Error when checking volume mount. Return code {return_code}")
                except ValueError as e:
                    if i > 4:
                        raise e

        sidecar_task = test_sharedvolume_mount()
您也可以在每個任務的基礎上建立自訂 pod_template_file,以便您可以在多個任務之間回收相同的基礎值。這將取代 airflow.cfg 中命名的預設 pod_template_file,然後使用 pod_override 覆寫該範本。
以下是一個同時具有這兩個功能的任務範例
import os

import pendulum

from airflow import DAG
from airflow.decorators import task
from airflow.example_dags.libs.helper import print_stuff
from airflow.settings import AIRFLOW_HOME

from kubernetes.client import models as k8s

with DAG(
    dag_id="example_pod_template_file",
    schedule=None,
    start_date=pendulum.datetime(2021, 1, 1, tz="UTC"),
    catchup=False,
    tags=["example3"],
) as dag:
    executor_config_template = {
        "pod_template_file": os.path.join(AIRFLOW_HOME, "pod_templates/basic_template.yaml"),
        "pod_override": k8s.V1Pod(metadata=k8s.V1ObjectMeta(labels={"release": "stable"})),
    }

    @task(executor_config=executor_config_template)
    def task_with_template():
        print_stuff()
管理 DAG 和日誌
是否使用永久卷是可選的,取決於您的組態。
DAG:
若要將 DAG 放入 worker 中,您可以
將 DAG 包含在映像檔中。
使用
git-sync,它會在啟動 worker 容器之前執行 DAG 倉庫的git pull。將 DAG 儲存在永久卷上,該永久卷可以掛載在所有 worker 上。
日誌:
若要從 worker 中取出任務日誌,您可以
使用掛載在 webserver 和 worker 上的永久卷。
啟用遠端記錄。
注意
如果您不啟用記錄持久性,並且如果您沒有啟用遠端記錄,則在 worker Pod 關閉後,日誌將會遺失。
與 CeleryExecutor 的比較
與 CeleryExecutor 相比,KubernetesExecutor 不需要 Redis 等額外組件,但確實需要存取 Kubernetes 叢集。
此外,可以使用內建的 Kubernetes 監控來監控 Pod。
使用 KubernetesExecutor,每個任務都在自己的 Pod 中執行。Pod 在任務排隊時建立,並在任務完成時終止。從歷史上看,在叢發工作負載等情況下,與 CeleryExecutor 相比,這展現了資源利用率的優勢,在 CeleryExecutor 中,無論是否有任務要執行,您都需要固定數量的長時間執行的 Celery worker Pod。
但是,官方 Apache Airflow Helm chart 可以根據佇列中的任務數量自動將 celery worker 縮減為零,因此當使用官方 chart 時,這不再是一個優勢。
使用 Celery worker,您通常會減少任務延遲,因為 worker Pod 在任務排隊時已經啟動並執行。另一方面,由於多個任務在同一個 Pod 中執行,因此使用 Celery 時,您可能需要更注意任務設計中的資源利用率,尤其是記憶體消耗。
KubernetesExecutor 可能有幫助的一種情況是,如果您有長時間執行的任務,因為如果您在任務執行時部署,任務將繼續執行直到完成(或逾時等)。但是使用 CeleryExecutor,如果您設定了寬限期,則任務只會繼續執行到寬限期結束,屆時任務將被終止。KubernetesExecutor 可以很好地運作的另一種情況是,當您的任務在資源需求或映像檔方面非常不一致時。
最後,請注意,不一定是二選一;使用 CeleryKubernetesExecutor,可以在同一個叢集上同時使用 CeleryExecutor 和 KubernetesExecutor。CeleryKubernetesExecutor 將查看任務的 queue 以確定是在 Celery 還是 Kubernetes 上執行。預設情況下,任務會傳送到 Celery worker,但如果您希望任務使用 KubernetesExecutor 執行,則將其傳送到 kubernetes 佇列,它將在自己的 Pod 中執行。無論您使用哪個執行器,都可以使用 KubernetesPodOperator 達到類似的效果。
容錯能力
提示
若要疑難排解 KubernetesExecutor 的問題,您可以使用 airflow kubernetes generate-dag-yaml 命令。此命令會產生 Pod,因為它們將在 Kubernetes 中啟動,並將它們轉儲到 yaml 檔案中供您檢查。
處理 Worker Pod 崩潰
當處理分散式系統時,我們需要一個系統,該系統假設任何組件都可能在任何時刻崩潰,原因從 OOM 錯誤到節點升級不等。
如果 worker 在可以將其狀態回報給後端 DB 之前死亡,則執行器可以使用 Kubernetes watcher 執行緒來發現失敗的 Pod。
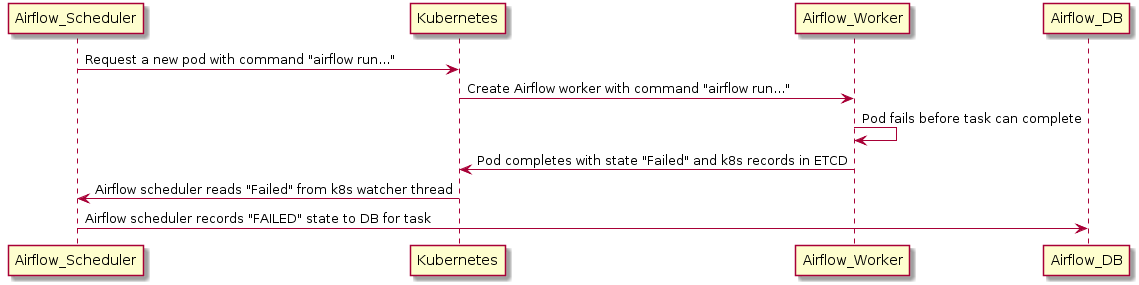
Kubernetes watcher 是一個執行緒,可以訂閱 Kubernetes 資料庫中發生的每個變更。當 Pod 啟動、執行、結束和失敗時,它會收到警報。透過監控此串流,KubernetesExecutor 可以發現 worker 崩潰,並正確地將任務回報為失敗。
但是如果排程器 Pod 崩潰怎麼辦?
在排程器崩潰的情況下,排程器將使用 watcher 的 resourceVersion 恢復其狀態。
當監控 Kubernetes 叢集的 watcher 執行緒時,每個事件都有一個單調遞增的數字,稱為 resourceVersion。每次執行器讀取 resourceVersion 時,執行器都會將最新值儲存在後端資料庫中。由於儲存了 resourceVersion,因此排程器可以重新啟動並從上次中斷的地方繼續讀取 watcher 串流。由於任務獨立於執行器執行,並將結果直接回報給資料庫,因此排程器故障不會導致任務失敗或重新執行。